Friday, February 29, 2008

How to Boil Pasta


Ralph Waldo Emerson wrote: "Build a better mousetrap and the world will beat a path to your door." Well, the quote doesn't exactly fit my purpose here, but close. There are creative people who thrive on finding a different solution, an innovation, to a problem. In the culinary world, chefs need to create on a dime. Every day. Here, we're talking about pasta. And there's nothing quite like overcooked pasta. I do like it just barely done - but al dente still. So, instead of guessing and having to remove a strand of lingine from the boiling pot, here's a foolproof and very Italian method. There really is more than one way to boil pasta. I know, this isn't exactly a very interesting post subject, but I ran across something in my stack of recipes that I've had for years, and used many times. So, I thought I'd share it with you.

The advice came from a cooking instructor. What class, I can't tell you. It's something she passed out to all of her class participants, every class she teaches. And it's a photocopy from the back of a package or box. Agnesi is an Italian company - they do have a website, but it's all in Italian.

Anyway, the instructor was also a caterer, and she said this is her failsafe method. She uses it always. And as long as I remember, on those occasions when I do make pasta, it's works like a charm.
  • "The ANGESI Advice for a Better Pasta Cooking Method: cook pasta in boiling water for just 2 minutes. Measure this time from the moment the water returns to a boil after adding the pasta. After the 2 minutes are up, remove pot from the heat, cover with a lid and leave to stand for the cooking time indicated on the box. Drain the pasta and . . . buon appetitto! This is to encourage you to try a new way of cooking pasta. You will see that when the cooking time is over, the water is almost clear. This is because the pasta has retained most of its precious nutrients, some of which are lost during the normal, longer cooking method."

Thursday, February 28, 2008

Quick (Modern) Coq au Vin


Since I Tivo all the America's Test Kitchen programs, I store them up and watch several at one time. They did one a week or so ago called French Classics. It included this Coq au Vin (coke-aw-vahn, chicken in wine) and a chocolate Pots de Creme. I printed out both recipes, and today you get to hear the results of the chicken.

When I was in my 20's, and living in Denver, I think it was, I attended one of my first cooking classes, and the teacher prepared the traditional coq au vin. It required many steps, including rendering some salt pork. Salt pork's not something I see every day, although I suppose it is available at the grocery stores if I sought it out. I have made coq au vin a few times, but never found the chicken all that tender (dry and overcooked) and the gravy was very thin.

The chefs at America's Test Kitchen came to the rescue. They explained that originally French kitchens used a very elderly boiling chicken, the kind you have to cook and cook to tenderize. These days we have young, tender fryers which don't require much cooking. They demonstrated a rather rapid coq au vin, and I was intrigued. It used bacon instead of salt pork. I love the richness and suppleness of red wine, cooked down to a thick gravy with the onions and mushrooms. This recipe took about 50 minutes of total cooking time (browning and simmering), with about another 25 of prep. So, I had dinner on the table in a little over an hour. Their recipe said it took 90 minutes.

The secrets of this recipe include reducing the entire bottle of wine and chicken broth to about 3 cups, browning the chicken first, then making the vegie part (mushrooms and onions) and then simmering the dark meat pieces first (for 20 minutes), THEN adding in the chicken breasts later, so they cook only 20 minutes. What a difference that made. The breast meat was tender and juicy. Once the chicken is done you remove it to keep warm and turn the heat up to high and continue reducing the gravy until it's thick. A tablespoon of butter is added at the very last, along with a tablespoon of the red wine you saved at the beginning, that didn't get reduced.

Definitely I'd make this again. It was certainly a lot easier than my previous recipe. I might not make it for guests just because it's, to me anyway, a kind of home comfort food dinner. But, it looked very pretty in my wide soup bowls with the gnocchi pasta in the bottom and the fresh Italian parsley sprinkled on top. We both slurped it up in quick order.

Cook's Notes: use a light, fruity red wine (they recommend Pinot Noir or a Rhone grenache). Use good, thick bacon (more flavor). If possible use kosher chicken, since it will retain the juice better. Next time I'd use more mushrooms, just because I like them. And if I had my druthers, I'd have more sauce, so that would mean using about a bottle and a half of wine to start with, and would mean measuring a bit more carefully so you reduce each part correctly.

Modern Coq au Vin
Recipe By : America's Test Kitchen
Serving Size : 6
1 bottle red wine -- fruity (pinot noir or Rhone grenache)
2 cups low-sodium chicken broth
10 sprigs fresh parsley
2 tablespoons fresh parsley -- minced
2 sprigs fresh thyme
1 bay leaf
4 ounces bacon -- thick-cut, cut crosswise into 1/4-inch pieces
2 1/2 pounds chicken pieces -- parts or thighs only Table salt and ground black pepper
5 tablespoons unsalted butter
1 cup frozen pearl onions -- thawed, drained, and patted dry
8 ounces mushrooms -- crimini, wiped clean, stems trimmed, halved if small and quartered if large
2 medium cloves garlic -- minced
1 tablespoon tomato paste
2 tablespoons all-purpose flour
1. Bring all but 1 tablespoon wine (reserve for later use), broth, parsley sprigs, thyme, and bay to simmer in large saucepan over medium-high heat. Cook until reduced to 3 cups, about 25 minutes. Discard herbs.
2. Meanwhile, cook bacon in large Dutch oven over medium heat until browned, 7 to 8 minutes. Using slotted spoon, transfer bacon to paper-towel-lined plate. Reserve 2 tablespoons fat in small bowl; discard remaining fat.
3. Lightly season chicken with salt and pepper. Heat 1 tablespoon reserved bacon fat in Dutch oven over medium-high heat until just smoking. Add half of chicken in single layer and cook until lightly browned, about 2 minutes per side. Transfer to plate and repeat with remaining chicken and 1 tablespoon bacon fat.
4. Melt 3 tablespoons butter in now-empty Dutch oven over medium-high heat. When foaming subsides, add pearl onions and mushrooms; cook, stirring occasionally, until lightly browned, 5 to 8 minutes. Reduce heat to medium, add garlic, and cook until fragrant, about 30 seconds. Add tomato paste and flour; cook, stirring frequently, until well combined, about 1 minute.
5. Add reduced wine mixture, scraping bottom of pot with wooden spoon to loosen browned bits; add 1/4 teaspoon pepper. Return chicken, any accumulated juices, and reserved bacon to pot; increase heat to high and bring to boil. Reduce heat to medium-low, cover pot, and simmer until chicken is tender, about 25 minutes, stirring halfway through cooking time.
6. Using slotted spoon, transfer chicken to large bowl; tent with foil to keep warm. Increase heat to medium-high and simmer sauce until thick and glossy and measures 3 cups, about 5 minutes. Off heat, stir in remaining 2 tablespoons butter and reserved 1 tablespoon wine. Season to taste with salt. Return chicken to pot and top with minced parsley. Serve immediately.
Per Serving: 553 Calories; 40g Fat (63.5% calories from fat); 38g Protein; 14g Carbohydrate; 4g Dietary Fiber; 159mg Cholesterol; 493mg Sodium. Exchanges: 0 Grain(Starch); 4 1/2 Lean Meat; 2 Vegetable; 5 Fat.
Printer-friendly version, click title at top.

Wednesday, February 27, 2008

Almond Crusted Orange Roughy with Lemony Leek Sauce


Whew! That's a mouthful of a title, isn't it? Nah, I didn't dream it up. Phillis Carey did, and in the cooking class she laughed at herself and how she titles recipes she's developed. She wants to make sure you know at the outset exactly what kind of good stuff is going to be included in the recipe.

Here's a shot of the classroom at Great News, in Pacific Beach (San Diego). It's by far the most glamorous and functional demonstration class kitchen I've ever seen. Six large screens are mounted above so you won't miss anything of the prep going on below.


Here's another shot of the other side of the classroom. Phillis is the chef up front in red.

So, what's the deal about this fish dish? The lemon leek sauce is the clincher. Absolutely wonderful. This can be made with any kind of mild white fish. Or even chicken. But the lemony piquant flavor lends itself very well to fish.

Phillis poured a bunch of sliced almonds in a big plastic bag and used her flat pounder to crunch the almonds. Do not use a food processor as it will make the almonds too much like meal. You want chunky, crunchy. You dip the fish in flour, egg, then the almond/parsley/lemon zest mixture, then pan fry it in a tiny bit of oil until done. Meanwhile you will have made the sauce first - leeks, butter, lemon juice and whipping cream. Oh yea. Whipping cream. This is a company-type meal; certainly not something you'd want to serve for everyday family cooking. The leek sauce is pureed in a blender, then you sieve it to remove the leeks. Use a medium gauge sieve; otherwise you'll never get the sauce to strain through.

Cook's Notes: be sure to dry off the fish fillets before you start dredging. If using a thicker kind of fish, like halibut, for instance, do the frying process, but just brown the fish, then put them on a parchment-lined pan in a 375 oven for 15 minutes. Thicker fish is harder to cook correctly in a pan saute. You can make the sauce ahead of time, but the dredging and frying have to be done at the last minute. Oh yes, and don't use a food processor for the almonds. If you are in a hurry to puree the leek sauce, be very careful because a hot sauce will explode right out of the blender. Best advice: puree in two smaller batches instead of just one.

Almond Crusted Orange Roughy with Lemony Leek Sauce
Recipe By: Phillis Carey, author & instructor
Serving Size : 4
2 tablespoons unsalted butter
2 medium leeks -- halved, thinly sliced
3 tablespoons lemon juice -- fresh
1 cup heavy cream
1 cup sliced almonds -- finely chopped
6 tablespoons Italian parsley -- chopped
1 1/2 tablespoons grated lemon peel -- using a Microplane
4 large orange roughy fillets
2 whole eggs -- lightly beaten
3 tablespoons butter -- for frying the fish
1. LEEK SAUCE: use only white and light green parts of the leeks, halve them, rinse well, then chop. Cook leeks in 2 T. butter over medium heat until very tender, about 15 minutes. Add the fresh lemon juice and stir until liquid evaporates. Mix in cream. Simmer until mixture is slightly thickened, about 2 minutes, maybe longer. Cool for 10 minutes, then pour in batches into blender and puree until smooth. Strain the sauce, using a coarse strainer, back into the saucepan. Season to taste with salt and pepper.
2. DREDGING MIXTURE: if you're using sliced almonds, place them in a plastic bag and using a pounder, hit nuts until they're reduced to a coarse mince. Do not use the food processor for this, as the nuts will be too fine. Mix almonds, parsley, lemon zest, salt and pepper to taste in a pie plate. Place flour on a plate and eggs in another pie plate. Sprinkle fish with salt and pepper. Dredge in flour, shaking off any excess. Dip in egg, then in almond mixture to coat.
3. FISH: Melt half of the butter in a large nonstick skillet over medium heat. Add 2 pieces of fish to pan and cook 3 minutes per side or until cooked in the center and brown on the outside. Repeat with remaining butter and fish. Reheat sauce and spoon a bit over, and the rest around fillets to serve.
Per Serving: 695 Calories; 59g Fat (74.2% calories from fat); 30g Protein; 17g Carbohydrate; 4g Dietary Fiber; 249mg Cholesterol; 233mg Sodium. Exchanges: 1/2 Grain(Starch); 3 1/2 Lean Meat; 1 1/2 Vegetable; 0 Fruit; 0 Non-Fat Milk; 11 Fat.
Printer-friendly recipe, click title at top.

Tuesday, February 26, 2008

Potato & Onion Cakes


I'm always on the lookout for a new and different side vegetable. One that isn't too difficult, but is attractive looking (for a company meal) and tastes good. This recipe was one from "the stack" I've talked about recently, of recipes I needed to file. It seemed like it would fit well with the grilled dinner we did about a week ago. There were a couple of different techniques in this recipe (using grated potatoes in a muffin tin) and gently smushing a red onion slice into the bottom beforehand.


The recipe is from Martha Stewart Living, November, 2006. It's not difficult, but does take a bit of fussing just before baking it. I got all the ingredients out, measured out what I'd need and had everything mis en place (ingredients in place, on a tray with everything I'd need) before I started. This must be constructed just before putting it in the oven because potatoes don't keep once they're grated. But I did what I could prior to that.
Ideally you need a 6-place large muffin tin. (You could use individual ramekins, no problem.) And since I don't bake muffins all that often, I was happy to find another use for the tin! First you butter the tin, sprinkle each cup with salt, pepper and a bit of brown sugar (all in the bottom). Then you drizzle a tiny bit of balsamic and red wine vinegars in the bottom of each cup, and artfully arrange a sprig of fresh rosemary across the bottom. Thin slices of red onion go in the bottom next (hopefully just the size of the bottom of the cup), then you grate the potatoes (quick work in the food processor) and toss with salt and pepper, and an egg yolk. Those are pressed firmly into the cup and you dot the top with a bit of butter. Bake for 30 minutes and you're done. You slide a knife around the edges and lift them out. Or, you could invert the whole pan. But I was concerned they wouldn't come out cleanly, so did them individually. I had to try several utensils before I found the right one. Very quickly place them on a HOT plate. They cool off quickly because they're kind of airy (the grated potato) so be ready to sit down to eat or serve them immediately. I'd make these again, just because they're pretty, and went well with a grilled dinner. These weren't a "wow" dish, but they were very good, and making some changes (see next paragraph) might make them "wow."
Cook's Notes: taste the potato mixture for salt and pepper before you pile them into the cups. Even though raw potatoes don't taste all that great, you want them to be seasoned right, and there's no way to do it otherwise. Try to arrange the onion slice "just so" in the bottom, so it looks pretty when you turn it out to serve. Next time I decided I'd add some Parmesan cheese to the potato mixture. And I'd mince up any remaining red onion and toss that in with the potatoes. Pack down the potatoes firmly, otherwise it breaks apart when you try to invert it. And lastly, I might try putting two slices of onion in the bottom if I could. You could also use frozen potatoes for this if you were so inclined.

Potato and Onion Cakes
Recipe By : Martha Stewart Living
Serving Size : 6
2 tablespoons butter
1 tablespoon brown sugar
1 tablespoon balsamic vinegar
1 tablespoon red wine vinegar
2 teaspoons coarse salt
1 teaspoon chopped rosemary -- plus 6 sprigs for ramekins
1 small red onion -- sliced into six 1/4" rounds
4 medium Yukon Gold potatoes -- grated
1 egg yolk -- slightly beaten
1. Preheat oven to 400 degrees.
2. Generously butter a large (six 1-cup) muffin tins. Sprinkle in the bottom of each cup salt, pepper and 1/2 teaspoon of brown sugar; drizzle each cup with 1/2 teaspoon of each vinegar. Place a rosemary sprig in each cup, then cover with an onion round. Can be made ahead to this point, about 2 hours before baking.
3. Shred potatoes in food processor, if possible, then toss with the chopped rosemary and the egg yolk in a medium bowl. Season with 2 teaspoons of salt and pepper to taste. Divide the potatoes amongst the cups, then dot with butter.
4. Bake until potatoes are tender and well browned, about 30-40 minutes. Remove from oven. Let cool 5 minutes. Run a thin knife around edge of each cup to loosen, invert onto a hot plate and serve.
5. Could be made an hour or so before serving, then reheat in a 300 oven.
Per Serving: 107 Calories; 5g Fat (39.5% calories from fat); 2g Protein; 14g Carbohydrate; 1g Dietary Fiber; 46mg Cholesterol; 672mg Sodium. Exchanges: 0 Lean Meat; 1/2 Vegetable; 0 Fruit; 1 Fat; 0 Other Carbohydrates.
Printer-friendly recipe, click title at top.

Monday, February 25, 2008

Warm White Bean & Brie Dip


I know, I can hear it already in your thoughts. What is this? Bean dip? Brie? Huh? What kind of nonsense is this? In a word: EASY. In another word: TASTY. Believe it or not, this is really very good. And ever so easy to make. I'll insert the full recipe below, but it's nothing more than a can of bean dip mixed up with little tiny cubes of brie (rind removed), and microwaved for about a minute. Serve.


It does take a little bit of time to cut off the rinds, but that's the hardest part. You can serve it with tortilla chips, but it makes it a bit more elegant if you serve it with crackers. I made lavash crisps from a post the other day for Coriander Lime Shrimp. Using crackers might make your guests think you didn't just open a can of bean dip and add cheese.

There's the photo of it in a ceramic bowl, ready for its minute of melting in the microwave. I didn't get an after picture, but I have some leftovers, so maybe I'll add another photo to this post later.


If you are in a hurry and want something really good and really quick, this is your ticket. The recipe came from Andrew Schloss, a chef and author, from his book Almost From Scratch. He taught a cooking class a few years ago. His schtick is about how to make things ahead, and make entertaining easier on yourself. He certainly scored on both counts.

Warm White Bean and Brie Dip
Recipe By : Andrew Schloss, chef & author, from a cooking class
Serving Size : 6
8 ounces Brie -- chilled
8 ounces bean dip -- canned
1. Remove rind from cheese and chop up into small pieces. Place the cheese and bean dip in a microwave-safe bowl. Microwave at full power for one minute, or until cheese is completely melted. Stir with a fork until well combined.
2. Serve warm with tortilla chips, bread or crackers.
Per Serving: 169 Calories; 12g Fat (62.5% calories from fat); 10g Protein; 6g Carbohydrate; 1g Dietary Fiber; 38mg Cholesterol; 422mg Sodium. Exchanges: 1/2 Grain(Starch); 1 Lean Meat; 1 1/2 Fat.
Printer-friendly recipe, click title at top.

Sunday, February 24, 2008

Armenian Parsley & Walnut Salad


When entertaining last weekend, we did a mixed grill: racks of lamb (3), Sicilian-Italian sausage with cheese in it (about 2 pounds), and some marinated chicken breasts too. We had grilled provolone cheese (I'll post the recipe soon) and some wonderful coriander lime shrimp as appetizers, so wanted a fairly simple side to serve with the meat. This salad came to mind as it's just wonderful with grilled meats, and it has a kind of Italian bent with the Mediterranean olives mixed in.


The recipe came from Nicole Aloni, a Hollywood caterer and cookbook author. She taught a cooking class some years ago, and we all enjoyed the food, but her stories about entertaining the celebs in Hollywood was most interesting. She kind of became a caterer to the stars by default - lucky, I guess - but her food is very good. Nothing healthy about it, usually, although this salad isn't a bad choice. She particularly works at preparing food the day before a party.


The salad is mostly composed of parsley (the curly leafed, not Italian) and toasted walnuts. But it's accented with Kalamata olives, green onions and fresh tomatoes, then tossed with a cumin, lemony dressing. Oh, and a bit of red chile flakes.


Cook's Notes: You could easily change the proportions of these items to suit your tastes, but the parsley needs to be the featured green. Ideally, make this one day ahead, but any longer than that and the parsley wilts down to nothing. Once you've made the salad, taste it and decide if you'd like to add more tomatoes, or parsley. Or perhaps more olives. Chop the olives fairly small, as they can overpower your taste buds if you get much of it in one bite. And don't skip the walnut toasting step - they add a wonderful grace note to the flavor in the overall salad.

Armenian Parsley & Walnut Salad
Recipe By : Nicole Aloni, author and caterer
Serving Size : 8
1 cup walnuts -- chopped, toasted, or almonds
2 bunches parsley -- regular curly, coarsely chopped
3/4 cup kalamata olives -- pitted, minced
1/2 cup scallion -- minced
1 cup fresh tomatoes -- peeled, seeded, chopped
1/3 cup extra virgin olive oil
1/3 cup fresh lemon juice
1/2 teaspoon cumin powder
1/2 teaspoon red pepper flakes
Kosher salt and pepper to taste
1. Toast nuts at 325° for about 10 minutes. Cool completely before using in the recipe.
2. Remove stems from the parsley and coarsely chop. Do not use a food processor for this as they will be too fine.
3. Chop the olives, walnuts and green onions, then combine all ingredients, tossing with the dressing. Add salt and pepper to taste. Chill.
NOTES : If the tomatoes are out of season, add just a teaspoon of sugar to sweeten them. You can also add mint to this salad if that is a flavor you enjoy. Be sure to use regular curly parsley (not Italian flat leaf) as it gives the salad some "lift." This improves if made a day ahead.
Per Serving: 248 Calories; 24g Fat (82.7% calories from fat); 5g Protein; 7g Carbohydrate; 2g Dietary Fiber; 0mg Cholesterol; 365mg Sodium. Exchanges: 0 Grain(Starch); 1/2 Lean Meat; 1/2 Vegetable; 0 Fruit; 4 1/2 Fat.
Printer-friendly recipe, click title at top.

Saturday, February 23, 2008

White Lady - an elegant cocktail


This looks like some sweet cream-based blended cocktail. It's not. And it's not really all that sweet, either. What it has in it is egg white (raw) which is shaken with the other ingredients, so when it's first poured it does have a bit of a cloudy look. This is kind of a martini. Or kind of like a margarita, in a way.


At the dinner party last weekend, we decided to offer not only wine, but a cocktail too. This was yet another recipe that found its way to the top of the "try me" file. And it was scrumptious, if you can describe a cocktail by that word. I'm looking forward to making it again. Even just for myself. The glasses are my friend Cherrie's. I don't own any martini type glasses. I need to look for some, but oh, dear. Where in the world am I going to store them? They're an awkward shape to store with any efficiency.


Several people had two of these cocktails, they were that good. The recipe came from Bon Appetit, January 2006. And it's a drink concocted by the Pegu Club (bar) in New York City.


I had all the ingredients standing ready, and you could easily make two of them at a time. You need fresh lemons, triple sec (or Cointreau, which is what I had), very good gin (Cherrie brought Bombay Sapphire, which in the opinion of many, the best out there), egg whites (which I very slightly whipped so I could actually use a measuring spoon to dip into it) and some ice. The ingredients go into a shaker and you pour it out. The recipe said to strain out the ice, but this is one gutsy drink, so I left the ice cubes in the drink. Your choice.

White Lady
Recipe By : Bon Appetit, Jan. 2006
Serving Size : 1
1/4 cup gin -- Tanqueray, or Bombay Sapphire
2 tablespoons Triple Sec -- or Cointreau
1 1/2 tablespoons fresh lemon juice
1 tablespoon egg white
1. Combine all ingredients in a shaker filled with ice cubes. Shake well. Strain into a cocktail or martini glass. Garnish with lemon slice if desired.
Per Serving: 265 Calories; 0g Fat (0.0% calories from fat); 2g Protein; 12g Carbohydrate; trace Dietary Fiber; 0mg Cholesterol; 26mg Sodium. Exchanges: 0 Lean Meat; 0 Fruit.
Printer-friendly recipe, click title at top.

Friday, February 22, 2008

Cream of Cashew Soup with Armagnac


The photo is a bit distorted - the glass isn't really that bowl shaped at the top. I served the soup in these small 4-ounce glasses, with a small spoon. Even though it was served hot, you could hold onto the bottom or top of the glass without burning your fingers.

My theory must have been, back when I clipped this recipe from Bon Appetit, that it was unusual, therefore, I'd like to try it. Unusual it is. Good? A resounding YES. Perhaps it's not the right first course for just any dinner, but it made a big hit at our recent dinner party. I made it two days ahead, then reheated it, added the cornstarch thickener (so little of it, I hardly think it mattered) and the Armagnac. The recipe comes from a now-defunct restaurant in Oxford, Maryland, called Mathilda's.


In case you don't know about Armagnac, here's the lowdown from Wikipedia:

  • Armagnac [pronounced ar-mahn-yak] is a distinctive kind of brandy or eau de vie, made of mainly the same grapes as cognac and undergoing the same aging in oak barrels, but mainly with column still distillation (cognac and part of armagnac is distilled in pot stills).
It comes from the mountainous regions in France near the Pyrenees. I always thought Armagnac had some affinity with apples, but no, it's all grapes. It's just the method of distillation and barreling that differentiates it. Much of the soil is rocky. Anyway, Armagnac is not an everyday staple in liquor stores, so you may have to seek it out. But you could also use Cognac or brandy instead. Just don't use some $4.99 bottle of rot-gut. The flavor does come through in this soup.

Cook's Notes: I didn't find unsalted cashews, so I used the lightly salted ones from Planter's. But, I did use low-sodium chicken broth. That way you can add salt if you would like to. If doing the cornstarch thing doesn't interest you, just eliminate it. I could not discern a bit of difference in the consistency of the soup after adding it. The chives add a nice touch - since the soup is definitely BEIGE, it needs a tad of color.

Cream of Cashew Soup with Armagnac
Recipe By: Mathilda's, Oxford, Maryland (restaurant is now closed), via Bon Appetit
Serving Size : 6
1/4 cup butter
1 tablespoon peanut oil
2 cups cashews -- roasted, unsalted
1/3 cup shallots -- chopped
28 ounces low-sodium chicken broth
1/4 cup cream sherry
2 cups half and half -- or fat-free half and half
1/2 cup heavy cream
2 tablespoons water
1 teaspoon cornstarch
2 tablespoons cognac -- or Armagnac (preferred)
2 tablespoons fresh chives -- minced
1. Melt butter with oil in heavy, large pot over medium heat. Add cashews and shallots. Cook until shallots are golden brown, stirring occasionally, about 10 minutes. Add broth and Sherry; increase heat to high and bring to a boil. Add the half and half and cream. Reduce heat to medium/low and simmer uncovered, until cashews are tender, about 20 minutes. Allow soup to cool about 20 minutes before continuing.
2. Working in batches, puree soup in blender until VERY smooth. Strain soup into a large saucepan, discarding solids left in strainer.
3. Whisk the water with cornstarch in a small bowl to blend. Bring soup to a boil, whisk cornstarch mixture into soup, stirring until soup thickens, about 2 minutes. Stir in Armagnac. Season with salt and pepper to taste. Divide among soup bowls or short glasses, sprinkle with chopped chives and serve.
Per Serving: 546 Calories; 49g Fat (75.7% calories from fat); 16g Protein; 19g Carbohydrate; 3g Dietary Fiber; 78mg Cholesterol; 148mg Sodium. Exchanges: 1 Grain(Starch); 1 1/2 Lean Meat; 1/2 Vegetable; 1/2 Non-Fat Milk; 9 Fat.
Printer-friendly recipe, click title at top.

Thursday, February 21, 2008

Chicken in a Hurry


You know what I mean when it's 6:00 and you need to get something on the table for dinner? Like right NOW. I have a go-to chicken recipe - it's not a 4-star winner, but it's certainly better than okay. My DH always says it's good, and I think it is too, as long as you know your purpose is to eat quickly.

It's nothing but this:

This is a can - a spice mix. It's imported from Hungary, although everything on the can is in English. The brand is "Pride of Szeged," "The World's Best Chicken Rub." It contains garlic, basil, paprika, oregano, salt and "spices." It can be purchased at some specialty grocery stores. The recipe on the back of the can suggests the following:

  • Mix 1/4 cup of seasoning mix with 4 T. oil. Add 2 T. lemon juice or vinegar. Brush entire mixture on chicken [it doesn't say how much chicken]. Grill, bake or broil. For best result, refrigerate chicken in seasoning for 2-6 hours.
When I'm in a hurry I do nothing but sprinkle the spice mixture on chicken pieces and pan fry them in a bit of olive oil. That's it. Sometimes after the chicken has browned on both sides, I'll pour in a splash of vermouth, or red wine, sometimes a squeeze of lemon juice, as suggested in the above recipe. Then I may put a lid on the pan to just steam the chicken completely. Serve.

This time I had boneless, skinless chicken thighs, and some Siciliana Sauce (a sweet and sour, cold, chunky tomato based sauce I blogged about last year) that is absolutely great with chicken. Our friends, Sue & Lynn, brought some over when they came for dinner a week ago. But I've often served the chicken with nothing but this rub.
I bought the chicken rub at a German deli (in 2005), but I've seen it other places. And I did find it online also at a mailorder site. There is a website for the product, but it's not displaying. Don't know what that means. The company also makes other rubs, but this is the only one I've found. I'm not posting a printer friendly recipe for this since it's so simple. As long as you have the spice mix.
For your information, I served this with brussels sprouts that I cut in half and simmered in a bit of chicken broth and thyme. They were ready at the same time the chicken was ready. From start to finish I had dinner on the table in about 25 minutes.

Wednesday, February 20, 2008

Sugar Snap Pea Tops/Greens/Tendrils


A week or so ago we visited the farmer's market by UCI (Univ. of California, Irvine) near us. It's the largest in our area, but about 6 miles away, so we don't visit this one very often. I'm glad we did, though. All the vegies I bought that day were so very fresh. Certainly fresher than what I buy at the grocery store. There was a lot of repetition, of course, because of the winter season - lots of carrots, root vegetables, cauliflower, winter squashes, apples, oranges and pears. But at one stand they had all different kinds of greens. The proprietor said, in her halting Asian accented English, that this bunch of green stuff was the tops of sugar snap peas. They were such a beautiful color. I should have snapped a photo of the before picture. A huge bunch was just enough for two servings.

I hadn't a clue what to do with them. A search on the internet for "sugar snap pea tops" disclosed nary a hit. So, I did what I thought was the best thing: first I washed them thoroughly. The larger stems were big enough that I thought they might be tough, so I pinched them off, leaving me with a huge mound of the pure tops, leaves and tendrils. I thoroughly enjoyed tossing them (for a total of about 3 -4 minutes) in a hot pan with a bit of olive oil, garlic and butter. I hit them with a shot of salt and pepper, and served. We both lapped it up in nothing flat. DH wanted seconds. Sorry, honey, all gone.

Tuesday, February 19, 2008

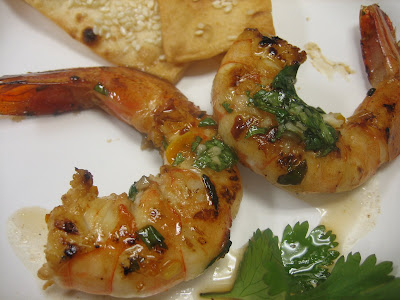
Coriander Lime Shrimp (an appetizer)


Another fabulous Phillis Carey cooking class recipe. Shrimp in a marinade (which also is a dipping sauce), made with fresh lime juice, cilantro (fresh coriander, hence the coriander in the title), soy sauce, garlic and marmalade. The shrimp are quick fried in a nonstick skillet and you serve it with the wonderful, tasty, tender lavash crisps on the side. The lavash crisp doubles as a little "plate" to put the shrimp upon. One nice mouthful of deliciousness. After learning about this recipe at a class, my friend Cherrie brought this to a dinner party at our home the other night. She brought 3 pounds of shrimp; there were 8 people in attendance; we ate all but a smidgen. Does that tell you how good it was?

Cook's Notes: if you don't like cilantro, substitute Italian parsley with a bit of oregano instead. Be sure to reserve some of the marinade before you put the shrimp into it to marinate.

Coriander Lime Shrimp
Recipe By : Phillis Carey, cookbook author & instructor
Serving Size : 6
MARINADE & DIPPING SAUCE:
1/2 cup fresh lime juice
1/4 cup orange marmalade
3 large cloves garlic -- minced or mashed
1 teaspoon salt
1/2 cup cilantro -- chopped
3 tablespoons olive oil
1 tablespoon soy sauce
1/2 teaspoon red pepper flakes
SHRIMP:
1 pound shrimp -- raw, 16-20 per pound, with tails
1 tablespoon olive oil
2 tablespoons cilantro sprigs -- for garnish
LAVASH CRISPS
1 package lavash Armenian cracker bread -- fresh, not dried crackers
1/2 cup butter -- melted
2 tablespoons sesame seeds
1. In a measuring cup whisk together lime juice, marmalade, garlic paste, cilantro, 3 T. of oil, soy sauce, red pepper flakes, and salt and pepper to taste. RESERVE 1/3 CUP MIXTURE FOR DIPPING.
2. In a large sealable plastic bag or bowl combine shrimp with the remaining marinade. Chill, tossing occasionally, to coat shrimp, for about 45 minutes or up to 3 hours. Drain shrimp and pat dry between paper towels.
3. In a large nonstick skillet, heat HALF of the 1 T. of oil and saute HALF the shrimp until golden brown and cooked through, about 1 1/2 minutes per side. Saute remaining shrimp in the remaining oil in same manner. Garnish shrimp with coriander sprigs and serve with reserved dipping sauce and crisps.
4. LAVASH CRISPS: Preheat oven to 375. Cut lavash bread in half lengthwise and then across into 2-inch wide strips. Brush tops with melted butter and sprinkle with sesame seeds. Arrange on baking sheets and bake 8-10 minutes, or until crispy. Cool slightly before serving. Will keep for a few hours.
Per Serving: 385 Calories; 28g Fat (64.3% calories from fat); 18g Protein; 17g Carbohydrate; 2g Dietary Fiber; 156mg Cholesterol; 828mg Sodium. Exchanges: 1/2 Grain(Starch); 2 Lean Meat; 0 Vegetable; 0 Fruit; 5 1/2 Fat; 1/2 Other Carbohydrates.
Printer-friendly recipe, click title at top.

Monday, February 18, 2008

Pear & Chocolate Tart


The photo doesn't do justice to this delicious dessert. As some other blogger wrote recently, "beige" food doesn't photograph well. Beige (pear) ice cream. Beige pears. Beige tart pastry. The only contrast is the chocolate horizontal stripe you can barely see at the bottom. That's not just a shadow, but chocolate. Good chocolate. We were entertaining guests for dinner, and I didn't take the dessert dish over to my good light (see photo below) I've put in the butler's pantry. It's just adjacent to the dining room. I didn't want to disturb our guests sitting but a few feet away. This blogging business is a bit distracting sometimes. Distracting to our guests. Distracting even to me sometimes.
So I took a photo with ambient light.

This doesn't look like much, but it's my new Lowel EGO blogging light. It lives in my butler's pantry (for now anyway). It's kind of innocuous looking, although larger than I'd thought. I'd like to hide it, but for now it lives out there in the open. It creates a very bright but diffused light to get better photos of the food. All for you, dear readers. In case you're interested, I learned about it over at Jaden's Steamy Kitchen.

I know the drill! A picture is worth a thousand words, and I know photos make a food blog interesting. Photos make people read on. So, through hectic food prep, making merry, washing dishes and everything else that goes along with producing a dinner party, I gotta have PICTURES! Fortunately, our family & friends who had dinner with us were patient with me. They may be thinking I'm totally NUTS doing what I'm doing - maybe even rude. Hope not, but it's possible! They all know I have a food blog, but it's one thing to talk about it, another to pause and prop pictures in the midst of a party.

So, back to this dessert. Which is delicious, if I didn't mention that before. I know I did - I'm just repeating it for emphasis. It's a subtle dessert - cooked pears aren't exactly bold, and there are just 8 ounces of chocolate in this, so you don't get a huge punch of it. But the combination of the two, with the tender pastry and the cool frosty ice cream on the side, make for one great dessert. This dessert is NOT difficult to make, despite the list of ingredients, and the long list of instructions. It's just that the steps are a bit detailed. You also need to have some Poire William, or pear brandy. Here's a photo of my bottle of Poire William, purchased some years ago. It was dear, that I remember, but you only use a little bit at a time. Do note the pear in the bottom of the bottle. How do they do that, you ask? They place the bottle over the pear when it's teeny tiny, somehow strap it to the tree branch, put an opaque cover over the top (otherwise the pear would burn in the sunshine), then let the pear mature.

This liqueur is not sweet - it's not really for sipping. Although perhaps the French do. I only use it for cooking, and the rare item, to be sure.


So, where'd the recipe come from? Another cooking class. From Kate Hill, an American woman, who moved to France probably 20 years ago. She bought an old barge, the Julia Hoyt, from Holland and sailed it down to Southern France where she parks it on the side of a canal. She bought a small cottage there, and even takes paying guests on the barge now and then. She's written a cookbook, called A Culinary Journey in Gascony, about her experiences, and with lots of peasant style recipes. She taught a cooking class about 5 years or so ago, right after her cookbook was published. This was the dessert she prepared. She has a blog, in case you're interested in reading. She posts recipes occasionally, but mostly the blog is about her life. Her day to day, with her adorable dog Bacon.

Cook's Notes: There are a few things to mention here. First, and most important, be certain your pears are the right stage of ripeness. I seem to have the toughest time with pears. The day they finally ripen, is not the day I'm ready to cook them. One day more and they've become grainy and inedible. So, this particular time I bought the pears 4 days before the event, and they were just the perfect shade of ripe. Thank goodness. Also, don't roll the dough too thin, as it will break when you try to pull up the sides. If you do that, the cream fraiche topping will ooze out all over everywhere. Take it from someone who knows from first hand experience about that! So read the directions carefully.

Pear and Chocolate Tart
Recipe By: Kate Hill, author
Serving Size : 8
PASTRY:
1 cup flour
1 tablespoon sugar
8 tablespoons unsalted butter
1 whole egg
1 tablespoon ice water
CHOCOLATE:
8 ounces dark chocolate -- Valrhona or Sharffen Berger

PEARS:
4 large fresh pears -- peeled and halved, not Bartlett
2 tablespoons Poire William -- or pear brandy
CREAM LAYER:
1 cup creme fraiche
1 whole egg
1/2 teaspoon vanilla
1 tablespoon vanilla sugar
1. Pastry: mix flour and sugar together and work in the butter in your fingers, until the butter is flaked and broken into the flour. Don't overhandle the dough. If it's a warm day, dip your hands in some icy water periodically, as the heat from your hands can begin to melt the butter.
2. Make a well in the center of the flour, then add egg and water. Mix with fork until most of the flour is absorbed. Knead lightly with your hand to form a smooth ball. This dough should be very "wet" and soft. Don't be tempted to add more flour because it's too sticky. It needs to be just barely manageable. Cover with a cloth and rest while you prepare the filling. Preheat oven to 425°.
3. Pear Filling: Slice the pears into a bowl to which you add the 2 T. of Poire William. Gently roll the pears in the liquid to keep them from discoloring.
4. Chocolate: Melt the chocolate over very low heat, or a double boiler with 3 T. of pear syrup (from the bowl of pears) or water.
5. Roll out the pastry to a rough rectangle. Try to make this fit onto a large baking sheet, approximately 11 x 14 inches, fitted with a Silpat or parchment paper. It is not necessary to have even edges and do not trim the edges. Try not to have any thin spots - if you do, cut from a fuller area and patch. Dough is very soft and will allow you to do this easily.
6. Spread the chocolate mixture onto the pastry, leaving about 1 1/2 to 2 inches of pastry all around the edge (this is the edge that gets folded inward). Spread as evenly as possible.
7. In a small bowl stir the creme fraiche, egg, vanilla and Poire William juice that is poured off from the pears. You may need to add another 2-3 tsp. of Poire William to make the mixture thickly pourable.
8. Place the pear slices on top of the chocolate in a decorative manner. Spoon a little bit of the cream mixture around the outer edges of the pears, but not so much that it dribbles out onto the outer dough. Carefully fold the pastry edge up over the chocolate pear mixture. Don't pull the dough - you do not want the dough to break anywhere or the filling will ooze out in the baking. The edges do not meet - in fact you need to leave space because the creamy mixture goes in the center, and on top of the pears.
9. Gently pour or spoon the creme fraiche mixture into the center area - not on the pastry. If necessary, carefully lift up the edges of the pastry a little bit, to spoon into crevices. Try to cover most or all of the chocolate. Sprinkle with (vanilla) sugar and bake in the top half of your oven for 20-25 minutes, or until pastry is golden brown.
Per Serving: 450 Calories; 30g Fat (57.5% calories from fat); 6g Protein; 45g Carbohydrate; 4g Dietary Fiber; 111mg Cholesterol; 36mg Sodium. Exchanges: 1 Grain(Starch); 0 Lean Meat; 1 Fruit; 0 Non-Fat Milk; 6 Fat; 1 1/2 Other Carbohydrates.
Printer-friendly recipe, click title at top.

Sunday, February 17, 2008

Almond Bar Cookies


Another recipe I decided to try, from my recent filing spree. And I learned something with this particular one from Gourmet. If a recipe comes from that source, there are some advantages:
  • Firstly, you can go to Epicurious to read or find the recipe. (For recipes that are older, most are now on Gourmet's own website. Going back decades.)

  • And secondly, people who have tried the recipe, upload comments and reviews of the recipes.
This latter - reading comments - would have been very important to this recipe, had I done that. I would have learned that others who had made these found them way too greasy, but a simple reduction of butter would have helped. I didn't go to Epicurious, so, ended up with a cookie that is good, but just as many said, way, WAY too greasy. If you want to read the comments, click here.

Almonds are good, in my book. Almond paste adds a wonderful richness - and tenderness actually - to baked goods. When whipping up the batter/dough for this, it had a wonderful lightness to it, yet the cookies are solid with almond flavor. It wasn't hard to make. Just wished I had thought through the chemistry of 1 1/4 cups of flour and 2 whole cubes of butter. Too much, for only 25-30 pieces. The cookies are delicious, but a little bit goes a long way. I probably will try these again, heeding the advice of others. You line the 8x8 or 9x9 pan with foil, BUTTER the foil (I question why that last step), then prepare the dough and spread it with an offset spatula in the readied pan, then brush with egg white so the sliced almonds will stick to the top. Bake. Easy.

Almond Bar Cookies
Recipe By: Gourmet Magazine, Dec. 2004
Serving Size : 25
1/2 cup almond paste -- not marzipan
1/2 teaspoon salt
3/4 cup sugar
3/4 cup unsalted butter -- softened [reduced from 1 cup in original recipe]
1 large egg -- separated
1 1/4 cups all-purpose flour
1 teaspoon almond extract
1. Preheat oven to 350 degrees.
2. Butter a 9 x 9 pan, line with foil, then butter the foil.
3. In food processor, pulse almond paste until broken in small bits, then add 1/4 c sugar and salt, processing 1 minute more. In a large bowl, beat together butter and remaing sugar, 3 minutes. Add almond mixture, egg yolk, and almond extract, beat 2 minutes more. Reduce speed, then add flour. Mix until combined.
4. Spread batter evenly in pan and brush with egg white. Bake 35-40 minutes.
5. Cool in pan 1 hour. Cut into 25 squares.
Per Serving: 119 Calories; 7g Fat (52.5% calories from fat); 1g Protein; 13g Carbohydrate; trace Dietary Fiber; 23mg Cholesterol; 47mg Sodium. Exchanges: 1/2 Grain(Starch); 0 Lean Meat; 1 1/2 Fat; 1/2 Other Carbohydrates.
Printer-friendly recipe, click title at top.

Saturday, February 16, 2008

Fish Chowder with a Thai twist


Even though I live in a city, close by there aren't any independent fish markets. Our grocery stores carry fresh fish, but I don't like it much. The flesh is soft. Makes me think the fish has been treated somehow. And I never think the fish is truly fresh. The cardinal rule is that if fish smells fishy, it probably isn't fresh. Even though I know they aren't supposed to. I'm leery of a lot of shrimp I see, because of the horror tv programs I've watched about the dirty, filthy pens they're raised in, mostly along Asian coasts, and how vegetation won't even grow near these pens because the water has been so destroyed from the detritus from the shrimp. Shrimp is the number one desired fish among Asian consumers, apparently. Shrimp caught in our waters aren't all that great, either, with moderate levels of mercury.

Our closest independent fish market (that presumably carries fish and shellfish from reputable sources and not the endangered species - although they did have Chilean Sea Bass, which I didn't buy) is about 10 miles away, and it's down a busy freeway that clogs with traffic unless you return before about 11:00 am. So I don't go there very often. But yesterday I had to drive about 13 miles that direction to buy the very best Italian sausage and stopped at this fish market on the way back.

Freezing fresh fish isn't what I like to do, either, so I buy only what we can eat immediately. I bought about a pound of "chowder chunks" (halibut, swordfish, cod, tilapia) and some rock shrimp. I told the fish monger I didn't want any salmon or tuna in the mixture, which he was kind enough to do. For me, the addition of tuna and salmon overpowers a fish stew. Also bought some ready-made ceviche that we enjoyed with lunch, along with about 5 ounces of fresh Dungeness crabmeat which went on a lovely green salad.

I used a couple of recipes to concoct this fish stew/chowder. It took about 35 minutes to put together, start to finish. First I sauteed a bit of pancetta in olive oil (you could use bacon and next time I will), then added a large onion, chopped, two small leeks, chopped, about 2 cups of chopped celery, also some fresh spring garlic (look like green onions, but they're young garlic and you could just add one clove of regular garlic, minced) a bit of jalapeno, and some mushrooms. Then I added some seafood stock (mine came from Penzey's, and it's a concentrate you mix with water) but you could use clam juice instead, or even chicken broth. A can of light coconut milk, some red bell pepper minced, and 4 stalks of lemon grass, cut in half lengthwise. That stewed for a bit, then I removed the lemon grass, added a bit of thyme, and about a cup of fat-free half and half (or use the real thing) and a big splash of heavy cream. Once that came to a simmer I added all the chowder chunks (cut into smaller bite-sized pieces) and the shrimp (snipped into smaller pieces) and allowed it to just rumble even below a simmer for 3-4 minutes. Done. I was all out of cilantro, otherwise I would have sprinkled some on top. This recipe makes a thin broth, yet creamy. And the fish chunks were lovely. It was an easy dinner, served with a couple of slices of fresh sourdough bread. The best part is that I have enough for another dinner as leftovers. I'll reheat it very gently so the fish doesn't break apart. This wasn't a "wow," over the top kind of dish, but it was warm and tasty for a cold winter's night.

Fish Stew with a Thai Twist
Serving Size : 6
2 tablespoons olive oil
1/2 cup pancetta -- chopped, or bacon
1 large onion -- peeled, chopped
2 cups celery -- chopped
2 small leeks -- trimmed, chopped
1/3 cup red bell pepper -- chopped
1 whole garlic clove -- minced
1 small jalapeno chile pepper -- minced, optional
1/2 cup mushrooms -- sliced
3 stalks lemon grass -- trimmed, halved lengthwise
6 cups fish stock -- or clam juice
14 ounces light coconut milk
1 cup half and half -- or use fat-free
1/2 cup heavy cream
1 pound fish fillets -- chopped in bite-sized pieces
1/2 cup fresh shrimp -- chopped
1 teaspoon dried thyme
1. Warm the olive oil in a large stock pot, then add the pancetta. When it's just begun to brown, add the onion, celery and leeks. Saute for a few minutes, then add the garlic, jalapeno, mushrooms and lemon grass stalks. Lastly add the red bell pepper.
2. Add the fish stock and bring to a simmer, reduce heat and continue to bubble lightly for about 15 minutes. Remove lemon grass and discard.
3. Add the coconut milk, half and half and heavy cream and bring back to a simmer. Add the thyme, then add the fish chunks and gently bring back to a simmer. Allow to cook for just 3-5 minutes just BELOW a simmer. Serve.
Per Serving: 492 Calories; 29g Fat (54.9% calories from fat); 28g Protein; 25g Carbohydrate; 3g Dietary Fiber; 134mg Cholesterol; 901mg Sodium. Exchanges: 0 Grain(Starch); 3 Lean Meat; 1 1/2 Vegetable; 0 Fruit; 0 Non-Fat Milk; 4 Fat; 0 Other Carbohydrates.
Printer-friendly recipe, click title at top.

Friday, February 15, 2008

Bobotie


Probably 30 years ago I saved a recipe for Bobotie, after reading it in some magazine. It sounded so unusual - a ground meat dish (a casserole, actually, like a meatloaf) with some raisins and almonds, plus some curry powder, then topped with a kind of eggy custard. I'd never made it. Until the other night. I've had it served to me - some friends of ours are from South Africa - and they entertained us one night and served their version. This has been a couple of years ago, but I believe it was served with rice, chutney and some other condiments. I really enjoyed it. This version resembles a recipe I found in Gourmet, but I made several changes based on the other recipes I had to refer to.

I knew it was an African-historied dish, but here's more, from Wikipedia:

  • Bobotie is a South African dish consisting of spiced minced meat baked with an egg-based topping. The recipe probably originates from the Dutch East India Company colonies in Batavia, with the name derived from the Indonesian Bobotok. It is also made with curry powder leaving it with a slight "tang".
  • It is a dish of some antiquity: it has certainly been known in the Cape of Good Hope since the 17th century, when it was made with a mixture of mutton and pork. Today it is much more likely to be made with beef or lamb, although pork lends the dish extra moistness. Early recipes incorporated ginger, marjoram and lemon rind; the introduction of curry powder has simplified the recipe somewhat but the basic concept remains the same. Some recipes also call for chopped onions to be added to the mixture. Traditionally, bobotie incorporates dried fruit like raisins or sultanas, but the sweetness that they lend is not to everybody's taste. It is often garnished with walnuts, chutney and bananas.

Cook's Notes: If you enjoy curry, you might want to add more. Be sure to serve this with rice (it's customary) and some condiments, preferably some chutney. The apple isn't always included - your choice. Make certain the onion and apple are minced up finely so the meatloaf will be cohesive. The lemon leaves are not a requirement, but they must be traditional in South Africa. I didn't have any bananas, but they appear in several recipes for Bobotie.

Bobotie
Recipe: Loosely based on a Gourmet recipe.
Servings : 5
1 slice bread -- fresh, chopped finely
1/3 cup milk
1 medium onion -- thinly sliced in rings
1/2 small Granny Smith apple -- peeled, cored, finely chopped, optional
1 teaspoon salt
1 1/2 tablespoons unsalted butter
3 tablespoons raisins -- minced
2 tablespoons slivered almonds
1 1/2 tablespoons curry powder -- preferably Madras
1/2 teaspoon sugar
2 large eggs
1 pound ground beef -- or lamb, not lean
1 tablespoon fresh lemon juice
1/4 teaspoon lemon zest
1/8 teaspoon black pepper -- freshly ground
3 whole lemon leaves
1. Make sure bread crumbs are very small. Remove crusts, then cut and chop, if necessary. Soak bread crumbs in milk in a small bowl until very soft, about 15 minutes, then drain by squeezing lightly, pressing to remove excess milk. Save milk.
2. Preheat oven to 350 and set rack in the middle. Butter a baking dish - flatter is better than taller.
3. Place sliced onions in a small frying pan with about 2 T. of water and simmer until onions are moderately limp. Pour off water, then pour out onto a cutting board and MINCE onions until they're diced. In same frying pan melt butter and add diced apple and onions. Saute until both onions and apples are fully cooked, but not longer. Set aside to cool while you prepare the meat.
4. In a large bowl combine the ground meat, raisins, almonds, salt, curry powder, lemon zest, sugar and one egg. Then add the bread cubes and the onions/apple mixture and gently combine. Add the lemon juice sprinkled all over the meat. Place meat mixture in pan and pat down just so it reaches corners. (It's preferable if the meat is not totally mashed flat - some peaks and valleys are good.) Roll lemon leaves into long cylinders and stick each into the meatloaf, standing upright.
5. Bake meatloaf for 30 minutes. Remove from oven and pour off any liquid/fat from the pan.
6. Just before the end of the baking time, combine the remaining milk and the remaining egg. Sprinkle with a dash of salt. Mix until thoroughly combined, then pour over the meatloaf. Return to oven and continue baking for another 15 minutes until the custard is set.
Per Serving: 426 Calories; 33g Fat (68.4% calories from fat); 20g Protein; 14g Carbohydrate; 2g Dietary Fiber; 174mg Cholesterol; 341mg Sodium. Exchanges: 1/2 Grain(Starch); 2 1/2 Lean Meat; 1/2 Vegetable; 1/2 Fruit; 0 Non-Fat Milk; 5 Fat; 0 Other Carbohydrates.
Printer-friendly recipe, click title at top.

Thursday, February 14, 2008

Orzo Carbonara with Bacon & Thyme


You know, orzo is a rice-shaped pasta. Once it plumps up, it grows a bit in size, but still looks like large, very large, grains of rice. And carbonara is a rich, cream-laden Italian preparation of pasta with bacon as the primary flavor. Yet, risotto is a creamy rice preparation too, that can vary with the additions. So, Phillis Carey combined all of these culinary variations and created a great risotto-like pasta side dish. Since I like bacon a whole heck of a lot, and thyme is my most favorite-est herb, this satisfies like comfort food.

The preparation is fairly simple, although you do have to heat up the broth and be near the range when you're making this. But you don't have to stir for 30-45 minutes like you do with risotto. It comes together in about 30 minutes.

Cook's Notes: you may need to add more liquid to this - depends on how long it takes to cook the orzo. If you've run out of broth, just add water. This wants to be on the wet side - it should not be stiff when served, but creamy, soft. Once you add the cream and bring it to a simmer, have everything ready because you want to serve this immediately. I mean immediately.

Orzo Carbonara with Bacon & Thyme
Recipe By: Phillis Carey, cookbook author & instructor
Serving Size : 6
4 slices thick-sliced bacon -- 1/2 inch pieces
2 tablespoons unsalted butter
1 pound orzo
5 cups low-sodium chicken broth -- heated to a simmer
1/4 cup heavy cream
1 cup Parmesano-Reggiano Cheese -- freshly grated
1 teaspoon fresh thyme -- chopped
1. Cook bacon in heavy saucepan over medium heat until crisp, about 8 minutes. Using a slotted spoon transfer bacon to paper towels and drain.
2. Pour off all but 1 T. of drippings from pan. Add butter and melt. Add orzo and toss in butter. Add 3 cups chicken broth and bring to a boil. Simmer, uncovered, adding more broth as needed to keep orzo from sticking to bottom the pan. Cook orzo until just tender and broth is absorbed, about 8-10 minutes.
3. Add heavy cream and bring to a simmer. Mix in cheese, bacon and thyme and season with salt and pepper to taste. Serve immediately.
Per Serving: 426 Calories; 15g Fat (29.5% calories from fat); 22g Protein; 58g Carbohydrate; 2g Dietary Fiber; 31mg Cholesterol; 178mg Sodium. Exchanges: 4 Grain(Starch); 1 1/2 Lean Meat; 0 Non-Fat Milk; 2 1/2 Fat.
Printer-friendly recipe, click title at top.

Wednesday, February 13, 2008

Triple Chocolate Torte with Raspberries


Kind of like lava. Thick gooey deliciousness. There's nothing in this not to like - chocolate, white chocolate, raspberries, and whipped cream. This would make a perfect ending to a Valentine's Day dinner.

If you happen to want to make something very chocolatety and very rich, this is your ticket to nirvana. I was surprised that it didn't keep me awake the other night with the caffeine, although it's only got 8 ounces of chocolate (dark stuff) in the whole torte, so that must be why.

Credit goes to Phillis Carey, from a cooking class I took. Over the years of taking classes from her, she's made some really wonderful desserts, and some really good chocolate ones at that. So here's another to add to the stable of chocolate yumminess.

Really, this is a fairly simple dessert to make. You do have to prepare the pan (springform) and line it with parchment. And you'll mess up a few bowls getting all the different batters made, but all combine into one in the end, and you pour it into the springform and bake. It's served with the frozen raspberries in syrup (from the grocery store), thawed, of course, and a nice mound of whipped cream.

Knowing when the torte is DONE is a bit tricky here. This one pictured, is probably a tad under-done - the center of it was too lava like. But it worked and tasted just fine. At about the 35 minute mark, you insert a pick into the center, and you do not want all sticky stuff. In fact, when this one was removed, there was just a tiny, tiny bit of goo, and just a few crumbs attached to the pick. And yet, it was still a bit underdone. Keep testing the torte every 3-4 minutes thereafter until it's done to your liking.

Cook's Notes: Phillis told us to buy white chocolate chips from Trader Joe's because they do contain cocoa butter. Most white chocolate does not. Those other brands will work, but the cocoa butter ones are better. She also cautioned us to NOT chunk up a white chocolate bar for this because it will just melt into the batter and you won't SEE the white chocolate at all (you can see the chips in the photo). That's not what you want here. White chocolate chips contain something (is it wax?) to keep them from melting, like regular chocolate chips. And lastly, do not eliminate the whipped cream because this dessert is really, really rich, and you need the cream to cut down that solid richness. Also, Phillis' recipe contained 2 full cups of sugar. I thought it was too, too sweet, so reduced the sugar by 1/4 cup in both instances (you add the sugar to two different batters as it's made). You can use your own judgment.

Triple Chocolate Torte with Raspberry Sauce
Recipe By: Phillis Carey, cookbook author & instructor
Serving Size : 12 [maybe even 16-18]
1 cup unsalted butter
4 ounces unsweetened chocolate -- chopped
4 ounces semisweet chocolate -- chopped
3/4 cup sugar [reduced from 1 cup]
1 teaspoon vanilla
4 large eggs
3/4 cup sugar [also reduced from 1 cup]
1/2 teaspoon salt
1 1/4 cups all-purpose flour
1 1/2 cups white chocolate chips -- Trader Joe's if possible
10 ounces frozen raspberries -- in syrup, thawed
1 cup heavy cream
2 tablespoons powdered sugar
1 teaspoon vanilla
1. Preheat oven to 350. Butter a 9-inch or 10-inch (preferred) springform pan and line bottom with a circle of parchment paper.
2. Combine butter and both chocolates in a medium saucepan. Stir over low heat until melted and smooth. Remove from heat. Add 3/4 cup sugar and stir until sugar dissolves, about 1 minute. Stir in vanilla. Set aside and allow to cool for about 5 minutes.
3. In a large bowl whisk together eggs and 3/4 cup sugar. Whisk HALF of this egg mixture into the chocolate mixture.
4. Using a mixer, beat remaining egg mixture until pale yellow and slightly thickened, about 3 minutes. Gently fold chocolate mixture and salt into the egg mixture. Then, gently fold in flour, then the white chocolate chips. Spoon batter into prepared springform pan.
5. Bake torte until tester inserted in center of cake comes out with just a bit of gooey mixture, but with mostly crumbs, about 40 minutes. Do not overbake. Cool completely on a rack. Will keep at room temperature, covered, for up to 24 hours.
6. Prepare whipped cream: combine heavy cream, powdered sugar and vanilla and whip until peaks form.
7. To serve, cut into wedges and set on plates. Spoon raspberries and syrup over torte allowing juices to run over the sides. Top with a dollop of sweetened whipped cream.
Per Serving: 646 Calories; 40g Fat (55.1% calories from fat); 8g Protein; 66g Carbohydrate; 3g Dietary Fiber; 139mg Cholesterol; 165mg Sodium. Exchanges: 1 Grain(Starch); 1/2 Lean Meat; 0 Non-Fat Milk; 7 1/2 Fat; 3 1/2 Other Carbohydrates.
Printer-friendly recipe, click title at top.

Tuesday, February 12, 2008

Adobe Stew - and it's vegetarian and vegan too


It was some years ago now that we first had lunch at The Gypsy Den, in Costa Mesa (California). It happens to be in the same small shopping complex where we, my DH and I, get our hair cut, so we often try to make appointments around lunchtime. Sometimes my friend and owner/hair stylist Rachel, eat there together before or after the haircuts. But most often my DH and I eat there. He orders the same thing every single time we go. Mostly I do too. He has their Greek salad. I order a crock of their adobe stew.

So after eating this soup umpteen times, I asked one of the waitresses about it. She brought out a sheet of paper with a list of all the ingredients. It was up to me to figure out how much of what. That's all I had - a list of all the vegetables in it, and the names of the spices. I was amazed at how good it was, considering it was made with WATER. Not even broth. Not even vegetable broth. So their recipe is actually vegan and vegetarian if you don't count the cheese. I love it just as well,

no matter what you call it.
The restaurant fashions itself as a kind of hip, but very funky, mostly outdoor place. The OC Weekly described it this way: "nose-pierced babes woo scruffy-bearded grad students with promises of Foucault and vegetarian chili."

The Gypsy Den kitchen makes everything themselves, including their bread. They have lots of vegetarian items, but also make some sandwiches and salads with chicken and tuna, etc. The food is always - I mean always - good. I appreciate the fact that they make everything in house. The waitresses are a trip and a half - often with tattoos down their arms, in rather skimpy halter tops, tight pants, etc. You might not want to take your aging mother here, although I am one. But it's a favorite haunt of ours nevertheless.

So one time I decided to try making my own Adobe Stew. I came up with a kind of recipe. It's not the same as the Gypsy Den's, I'm sure, but it's close. Each time I've made it, it's been slightly different. Do notice how dark the broth is - so I assume they used a LOT of chiles. Cumin also adds to a dark-colored broth, but not THAT dark.

You can also buy ancho chili powder from some grocery stores, and also at Penzey's - and in fact that may be what they use rather than the dried chiles. Here in Southern California we have all kinds of fresh and dried chiles at our markets. Poblanos (a fresh chile) are at most stores, and anchos are dried poblanos. They're very mild, adding just about zero heat to the stew. Likely the chili powder does that.

So, first I'll give you the ingredient list - that way you can interpret it as you so choose. If you choose.

Gypsy Den Adobe Stew Ingredients: onions, oil, tomatoes (canned), garlic, bay leaves, oregano, ground cumin, ground coriander, chili powder, ancho chiles, corn, green beans, zucchini squash, yellow squash, pinto beans, water, cheddar cheese and jack cheese.

My scribblings on the day the waitress brought us the ingredient list.

Carolyn's interpretation of the "Gypsy Den Adobe Stew":
8 ancho chiles (if you don't know these, click here for info)
2 yellow onions, chopped
2 T. vegetable oil
2 pounds canned tomatoes, chopped, including juice
2-3 cloves garlic, minced
1 bay leaf
1 T. oregano, crushed in your hands
2 T. ground cumin
1 T. ground coriander
1-3 T. (mild) chili powder, to taste
1 lb. frozen corn
1 lb. frozen green beans
1 lb. canned pinto beans, drained
1 lb. fresh zucchini, chopped
1 lb. fresh yellow squash, chopped
About 3 quarts water (a guess, use your own judgment)
2 cups grated cheddar cheese
2 cups grated Jack cheese

When I made it I soaked the ancho chiles in water for several hours. Probably overnight would be fine. Then you'd drain them (save juice), seed them and remove stems. Then combine the juice and chiles in the blender and puree. Set aside. When I've made it I sauteed the onions first, then added the garlic, the spices and let it saute a bit. Then I added water - a lot - the tomatoes, and the reserved ancho chile puree, and let it simmer for about 30 minutes. Then I added frozen corn, frozen green beans, and canned pinto beans. Bring it back to a boil and simmer for about 15 minutes, then add fresh zucchini and yellow squash, which went in last. You add the cheeses on top of the soup and not so thick it doesn't melt.
Per Serving: 181 Calories; 9g Fat (44.2% calories from fat); 9g Protein; 18g Carbohydrate; 5g Dietary Fiber; 20mg Cholesterol; 399mg Sodium. Exchanges: 1/2 Grain(Starch); 1/2 Lean Meat; 2 Vegetable; 1 1/2 Fat.
Printer-friendly recipe, click title at top.

Monday, February 11, 2008

Crunchy Shrimp with Couscous & Sauce


You can't see the toasted couscous on the bottom, but it's there, topped with watercress, then lightly breaded shrimp, and drizzled with a delicious orange mayo sauce.

Another recipe from the "stack" I sorted through the other day. And this one is an absolute over-the-top winner. It's going into my "Top Favs" in my right column. There aren't all that many recipes in that list, but this one's going on it right now.

Ordinarily I might have passed by this recipe. We don't eat couscous, generally, because it's a high glycemic carb. Couscous is actually little tiny orbs of pasta, and takes no more than adding water (hot) to it and it's cooked and ready. But, this recipe won a cooking contest at Cooking Light in 2006. (I know, I told you, I've been behind in filing my recipes :-), and the rest of the recipe sounded so delish that I held onto it. DH and I went to a local farmer's market and had bought some fresh shrimp with no plan as to what I'd make with it.

Here's the crux of the recipe: you make a mayonnaise-based cold sauce with reduced orange juice, lime juice, cilantro, ginger and cumin. Then you toast the dry couscous in a large pan. THAT I'd never done before, but it added a wonderful taste to the simple prep of couscous. You add chicken broth and orange juice to plump up the couscous, then green onions and almonds at the last. The shrimp: rolled in egg white, then tossed around in a plastic bag with panko, cilantro, fresh ginger and some pepper. You quickly saute the shrimp, then start the artful arrangement: couscous on the bottom, a nice mound of fresh watercress, the hot shrimp, then you drizzle the whole thing with the sauce.


This is the couscous toasting golden brown in the pan.


The mayo (small amount, really) based orange ginger sauce that's drizzled over the top and becomes a kind of salad dressing.

The crunchy shrimp moments before serving. They're crusted with panko, cilantro, fresh ginger and ground black pepper.

The history of the recipe: Cooking Light - the Ultimate Reader Recipe Contest, 2006. There were several categories, but the judges were all, hands down, in love with this dish, which won first prize. The cook: Karen Tedesco of Webster Groves, Maryland.

Cook's Notes: I think next time I'd make a little more of the sauce - it was barely enough (because it's so darned good). Watch the couscous when you're toasting - it goes from normal to toasted in a matter of about 30-40 seconds. I'd chop up the watercress just a little bit. I'm kind of haphazard when I wrench off most of the stems, but even medium stems are hard to eat. This is a one-dish meal - you need nothing else with it. No salad. No side. It takes about 30-40 minutes from start to finish. Would make a lovely company meal.

Crunchy Shrimp with Toasted Couscous and Ginger-Orange Sauce
Recipe By: Karen Tedesco, Webster Groves, MO via Cooking Light
Servings: 4
SAUCE:
1 cup orange juice
1 tablespoon chopped fresh cilantro
2 tablespoons mayonnaise
1 1/2 tablespoons low-sodium chicken broth
1 teaspoon fresh ginger -- grated
1 teaspoon fresh lime juice
1/2 teaspoon ground cumin
1/4 teaspoon salt
1/4 teaspoon ground red pepper
COUSCOUS:
1 cup couscous -- dried
1 1/2 cups low-sodium chicken broth
1/2 cup orange juice
1/2 teaspoon salt
1/3 cup chopped green onions
2 tablespoons sliced almonds -- toasted
1 tablespoon unsalted butter
SHRIMP:
20 jumbo shrimp -- peeled and deveined (about 3/4 pound)
1 large egg white -- lightly beaten
1/2 cup panko
1 teaspoon chopped fresh cilantro
1/2 teaspoon fresh ginger -- grated
1/8 teaspoon freshly ground black pepper
1 tablespoon canola oil
2 cups watercress -- washed, trimmed, coarsely chopped
1. To prepare sauce, bring 1 cup orange juice to a boil in a small saucepan over medium-high heat; cook until reduced to 1/4 cup (about 10 minutes). Remove from heat; cool completely. Stir in 1 tablespoon cilantro and next 7 ingredients (through red pepper); set aside.
2. To prepare couscous, place couscous in a large nonstick skillet over medium-high heat; cook 3 minutes or until toasted, stirring constantly. Remove from heat and add 1 1/2 cups broth, 1/2 cup orange juice, and 1/2 teaspoon salt; bring to a boil. Cover and let stand 5 minutes. Fluff with a fork; add onions, almonds, and butter, stirring until butter melts. Keep warm. If made an hour ahead, briefly reheat in same pan until it's hot all the way through.
3. To prepare shrimp, combine shrimp and egg white in a bowl, tossing to coat. Combine panko, 1 teaspoon cilantro, 1/2 teaspoon ginger, and black pepper in a large zip-top plastic bag. Add shrimp to bag; seal and shake to coat.
4. Heat oil in a large nonstick skillet over medium-high heat; arrange shrimp in a single layer in pan. Cook 2 minutes on each side or until done.
5. Divide couscous evenly among 4 plates; top evenly with watercress and shrimp; drizzle sauce over shrimp.
Per Serving: 423 Calories; 17g Fat (34.3% calories from fat); 21g Protein; 52g Carbohydrate; 4g Dietary Fiber; 63mg Cholesterol; 557mg Sodium. Exchanges: 2 1/2 Grain(Starch); 1 1/2 Lean Meat; 0 Vegetable; 1 Fruit; 2 Fat.
Printer-friendly recipe, click title at top.